引用站外地址
尚硅谷 Web 前端之 Webpack5 教程
https://yk2012.github.io/sgg_webpack5/
前言 webpack是打包工具,平时开发时我们使用的框架(vue react) 以及样式处理器(scss less)等技术在浏览器端是无法被识别的这时候的需要webpack打包成(js css)后才能被浏览器识别而webpack5是webpack的最新版本它支持ES6语法并且支持tree shaking优化打包体积!
webpack是静态资源打包工具!以一个文件或多个文件作为入口,将我们整个项目所有编译合成一个或多个文件!webpack输出的文件为bundle文件!
主流的打包工具:
GruntGulpParcelWebpackRollupVitewebpack本身功能是有限的:开发模式: 仅能编译js中的ES Module语法!生产模式: 仅能编译js中的ES Module语法 ,以及压缩代码!
简单案例工程目录1 2 3 4 5 6 7 8 9 10 11 ├── dist │ └── main.js ├── package-lock.json ├── package.json ├── public │ └── index.html └── src ├── js │ ├── count.js │ └── sum.js └── main.js
搭建项目目录及文件workspace > webapck > webpack_demo1 > 具体文件如以下内容!
1 2 3 4 5 6 7 ├── public │ └── index.html └── src ├── js │ ├── count.js │ └── sum.js └── main.js
文件内容如下
count.js sum.js main.js index.html 1 2 3 export default function count ( num ){ return num++; }
1 2 3 export default function sum (a, b ) { return a + b; }
1 2 3 4 5 6 7 import count from "./js/count" ;import sum from "./js/sum" ;const sumResult = sum (12 ,25 );const countResult = count (1 );console .log ("sum result: " + sumResult)console .log ("count result: " + countResult)
1 2 3 4 5 6 7 8 9 10 11 12 <!DOCTYPE html > <html lang ="en" > <head > <meta charset ="UTF-8" > <meta name ="viewport" content ="width=device-width, initial-scale=1.0" > <title > Document</title > </head > <body > <h1 > hello webpack</h1 > <script src ="../dist/main.js" > </script > </body > </html >
sum.js count.js 导出的内容,整合到main.js,然后在index.html中引入main.js!
初始化 npm 目录创建初始化的package.json文件! -y参数为不在询问中创建 直接生成package.json文件!
安装 webpack 依赖1 npm install webpack webpack-cli -D
注意: package.json 文件中 name 不能为 webpack, 否则会下载不下来!
package.json
1 2 3 4 5 6 7 8 9 10 11 12 13 14 15 16 17 { "name" : "webpack_demo1" , "version" : "1.0.0" , "description" : "" , "main" : "./src/main.js" , "scripts" : { "test" : "echo \"Error: no test specified\" && exit 1" } , "keywords" : [ ] , "author" : "" , "license" : "ISC" , "devDependencies" : { "webpack" : "^5.90.3" , "webpack-cli" : "^5.1.4" } }
使用打包1 npx webpack ./src/main.js --mode=development --output-path=./dist
--mode: 打包模式开发模式_development 和 生产模式_production (会压缩文件)--output-path: 输出文件目录地址!
npx 是用来执行本地环境变量及node_modules下的./bin目录下的命令!
webpack核心概念entry(入口): 指示webpack从哪个文件开始下手!output(出口): webpack打包后的文件输出位置!loader(加载器): webpack本身只能处理js json等资源,需要借助其他loader webpack才能解析!plugins(插件): 扩展webpack功能的工具!devServer(开发服务): 自动化打包工具 自动编译打包!mode(模式): 开发模式_development 和 生产模式_productionwebpack.config.js1 2 3 4 5 6 7 8 9 10 11 12 13 14 15 16 17 18 19 20 21 22 23 24 25 26 27 28 29 30 31 32 33 34 35 36 37 38 39 40 41 42 43 44 45 46 const path = require ("path" )const outputPath = path.resolve (__dirname, "dist" );module .exports = { entry : "./src/main.js" , output : { path : outputPath, filename : "bundle.js" , }, module : { rules : [ ], }, plugins : [], mode : 'development' devServer : { open : true , host : "127.0.0.1" , port : 8080 , }, };
重新打包相对于以下方式打包
1 npx webapck ./src/main.js --mode=development
webpack 会自动查找webpack.config.js配置文件进行打包输出!
开发模式编译代码 是浏览器识别运行!样式资源 图片资源 html资源等, webpack默认无法处理这些资源,所以需要加载配置进行处理!代码质量检查处理资源webpack 本身不能处理样式资源,需要通过loader加载器来配置 css less sass stylus等资源!webpack文档来找到对应的loader!
引用站外地址
webpack文档_loader
https://webpack.docschina.org/loaders/
csscss-loader : 将css 转换为 commonjs模块到js中!style-loader: 将js中的css资源通过创建style标签添加到html文件中生效!
安装loader
1 npm install style-loader css-loader -D
配置loader
1 2 3 4 5 6 7 8 9 10 11 12 13 14 15 16 17 18 19 20 21 22 23 const path = require ("path" )const outputPath = path.resolve (__dirname, "dist" );module .exports = { entry : "./src/main.js" , output : { path : outputPath, filename : "bundle.js" , }, module : { rules : [ { test : /\.css$/ , use : [ "style-loader" , "css-loader" ], }, ], }, };
注意: use 下可以配置多个loader, 执行顺序从右到左 从下到上!
lessless 和 less-loader
1 npm install less less-loader -D
1 2 3 4 5 6 7 8 9 10 11 12 13 14 15 16 17 18 19 20 21 22 23 24 25 26 27 28 29 30 const path = require ("path" )const outputPath = path.resolve (__dirname, "dist" );module .exports = { entry : "./src/main.js" , output : { path : outputPath, filename : "bundle.js" , }, module : { rules : [ { test : /\.css$/ , use : [ "style-loader" , "css-loader" ], }, { test : /\.less$/ , use : [ "style-loader" , "css-loader" , "less-loader" ], }, ], }, };
sasssass 和 sass-loader
1 npm install sass sass-loader -D
1 2 3 4 5 6 7 8 9 10 11 12 13 14 15 16 17 18 19 20 21 22 23 24 25 26 27 28 29 30 31 32 33 34 35 36 37 const path = require ("path" )const outputPath = path.resolve (__dirname, "dist" );module .exports = { entry : "./src/main.js" , output : { path : outputPath, filename : "bundle.js" , }, module : { rules : [ { test : /\.css$/ , use : [ "style-loader" , "css-loader" ], }, { test : /\.less$/ , use : [ "style-loader" , "css-loader" , "less-loader" ], }, { test : /\.scss$/ , use : [ "style-loader" , "css-loader" , "sass-loader" ], }, ], }, };
stylusstylus-loader
1 npm install stylus stylus-loader -D
1 2 3 4 5 6 7 8 9 10 11 12 13 14 15 16 17 18 19 20 21 22 23 24 25 26 27 28 29 30 31 32 33 34 35 36 37 38 39 40 41 42 43 44 const path = require ("path" )const outputPath = path.resolve (__dirname, "dist" );module .exports = { entry : "./src/main.js" , output : { path : outputPath, filename : "bundle.js" , }, module : { rules : [ { test : /\.css$/ , use : [ "style-loader" , "css-loader" ], }, { test : /\.less$/ , use : [ "style-loader" , "css-loader" , "less-loader" ], }, { test : /\.scss$/ , use : [ "style-loader" , "css-loader" , "sass-loader" ], }, { test : /\.styl$/ , use : [ "style-loader" , "css-loader" , "stylus-loader" ], }, ], }, };
图片资源在webpack4中处理图片资源,是通过file-loader url-loader进行处理的!webpack5中已经将以上loader整合在一起了,只需要通过配置即可!
配置项
解析资源配置 以下时 将指定大小图片资源解析为 base64 或者 url!
1 2 3 4 5 6 7 8 9 10 11 12 13 { test: /\.(png|jpg|jpeg|gif|svg|eot|ttf|woff|woff2|png|ico)$/, type: "asset" , parser: { dataUrlCondition: { maxSize: 100 * 1024 , } , } } ,
具体配置 1 2 3 4 5 6 7 8 9 10 11 12 13 14 15 16 17 18 19 20 21 22 23 24 25 26 27 28 29 30 31 32 33 34 35 36 37 38 39 40 41 42 43 44 45 46 47 48 49 50 51 52 53 54 55 56 57 const path = require ("path" )const outputPath = path.resolve (__dirname, "dist" );module .exports = { entry : "./src/main.js" , output : { path : outputPath, filename : "bundle.js" , }, module : { rules : [ { test : /\.css$/ , use : [ "style-loader" , "css-loader" ], }, { test : /\.less$/ , use : [ "style-loader" , "css-loader" , "less-loader" ], }, { test : /\.scss$/ , use : [ "style-loader" , "css-loader" , "sass-loader" ], }, { test : /\.styl$/ , use : [ "style-loader" , "css-loader" , "stylus-loader" ], }, { test : /\.(png|jpg|jpeg|gif|svg|eot|ttf|woff|woff2|png|ico)$/ , type : "asset" , parser : { dataUrlCondition : { maxSize : 100 * 1024 , }, } }, ], }, };
字体图标或其他资源 module > rules
1 2 3 4 5 6 7 8 9 10 { test : /\.ttf|woff|woff2?|map3|map4|avi$/ , type : "asset/resource" , generator : { filename : "static/fonts/[name].[hash:8][ext][query]" , } }
处理js资源 有人可能会问,js 资源 Webpack 不能已经处理了吗,为什么我们还要处理呢?原因是 Webpack 对js 处理是有限的,只能编译js 中 ES 模块化语法,不能编译其他语法,导致js 不能在IE 等浏览器运行,所以我们希望做一些兼容性处理。针对is 兼容性处理,我们使用 Babel 来完成。 针对代码格式,我们使用 Eslint 来完成Eslint,检测代码格式无误后,在由 Babel 做代码兼容性处理
ESlint代码规则检查ESlint 是一个 JavaScript 代码检查工具,可以检查代码中语法错误,代码风格是否规范,代码中是否包含一些不好的习惯!
配置文件 新建文件.eslintrc.* 位于项目的根目录中
.eslintrc.eslintrc.js.eslintrc.json配置格式步一样!
package.json 中 eslintConfig: 不需要创建文件,在原有文件基础上写!具体配置 eslintrc.js为例
1 2 3 4 5 6 7 8 9 10 11 12 13 14 15 16 17 18 19 20 21 22 23 24 25 26 27 28 module .exports = { parserOptions : { esmaVersion : 6 , sourceType : "module" , ecmaFeatures : { jsx : true } }, rules : { "semi" : "error" , "no-console" : "off" , "no-unused-vars" : "warn" , "no-debugger" : "off" , "array-callback-return" : "warn" , "default-case" : [ "warn" , {commentPattern : "no default&" } ], "eqequal" : "error" , }, extends : [] }
在webpack中使用 在webpack中使用 ESlint 需要插件 eslint-webpack-plugin
安装eslint 1 npm install eslint eslint-webpack-plugin -D
如果在vscode中 可以通过 ESlint 插件 来在编写代码时及时反馈错误内容!
创建.eslintrc.js 配置文件 在根目录中创建该文件!
配置内容如下!
1 2 3 4 5 6 7 8 9 10 11 12 13 14 15 16 17 18 19 module .exports = { root : true , env : { node : true , browser : true , }, extends : ["eslint:recommended" ], parserOptions : { ecmaVersion : 6 , sourceType : "module" , parser : "babel-eslint" , }, rules : { "no-console" : process.env .NODE_ENV === "production" ? "warn" : "off" , "no-debugger" : process.env .NODE_ENV === "production" ? "warn" : "off" , "no-var" : "error" , }, };
在webpack配置文件中配置eslint插件 1 2 3 4 5 6 7 8 9 10 11 12 13 14 const ESLintPlugin = require ("eslint-webpack-plugin" );module .exports = { plugins : [ new ESLintPlugin ({ context : path.resolve (__dirname, "src" ), extensions : ["js" , "vue" ], exclude : ["node_modules" ], }) ] }
发现问题 版本问题
1 2 3 4 5 [webpack-cli] E:\my-project\webpack\data1\node_modules\eslint-webpack-plugin\node_modules\jest-worker\build\index.js:126 enableWorkerThreads: this._options.enableWorkerThreads ?? false , ^ SyntaxError: Unexpected token ?
如果出现以上问题,请安装 node 14 以上版本!
打包后的 js 文件也会报错问题
关闭eslint对打包结果检查规则!.eslintignore文件`
babel支持js新语法主要用于将 ES6 语法编写的代码转换为向后兼容的 JavaScript 语法,以便能够运行在当前和旧版本的浏览器或其他环境中!
配置文件 配置文件有多种写法!
babel.config.*babel.config.jsbabe;.config.json.babelrc.*.babelrc.babelrc.js.babelrc.jsonpackage.json中配置babel 不需要创建配置文件!具体配置 babel.config.js
1 2 3 4 module .exports = { presets : [] }
presets预设
一组Babel插件,扩展Babel功能!
@babel/preset-env: 一个智能预设, 允许可以使用最新的javascript语法!@babel/preset-react: 一个预设, 用于处理react-jsx语法!@babel/preset-typescript: 一个预设, 用于处理typescript语法!在 webpack中使用 安装 babel 1 npm install babel-loader @babel/core @babel/preset-env -D
配置 babel-loader 1 2 3 4 5 6 7 8 9 10 11 12 13 14 { test : /\.js$/ , exclude : /node_modules/ , use : { loader : "babel-loader" , }, },
在 babel.config.js中配置 在根目录新建babel.config.js
1 2 3 4 5 6 7 8 9 10 11 12 13 14 15 module .exports = { presets : [ [ '@babel/preset-env' , ] ], }
处理html资源 在webpack打包后html中引入资源路径 每次都需要手动去改比较麻烦! 因此需要通过html-webpack-plugin插件来处理!src: <script src="../dist/static/js/bundle.js"></script>html-webpack-plugin 可以帮我们自动引入外部链接 link script...
安装插件 1 npm install html-webpack-plugin -D
在webpack.config.js中加入插件 1 2 3 4 5 6 7 8 9 10 11 12 const path = require ("path" );const HtmlWebpackPlugin = require ("html-webpack-plugin" )module .exports = { plugins : [ new HtmlWebpackPlugin ({ template : path.resolve (__dirname, "public/index.html" ) }) ] }
修改文件输出路径 修改main.js入口文件到指定目录! 1 2 3 4 5 output : { path : outputPath, filename : "static/js/bundle.js" , }
修改图片资源到指定目录 在model > rules下配置
1 2 3 4 5 6 7 8 9 10 11 12 13 14 15 16 17 { test : /\.(png|jpg|jpeg|gif|svg|eot|ttf|woff|woff2|png|ico)$/ , type : "asset" , parser : { dataUrlCondition : { maxSize : 100 * 1024 , }, }, generator : { filename : "static/image/[name].[hash:8][ext][query]" , } },
自动清空打包资源 每次打包后自动将上一次打包结果清除!webpack4中需要插件clear-webpack-plugin来清空打包!
1 2 3 4 5 6 7 output : { path : outputPath, filename : "static/js/bundle.js" , clean : true },
搭建开发服务器 目前webpack每次打包后需要手动刷新页面才能看到新的内容,操作比较复杂, 因此需要搭建一个开发服务器!webpack-dev-server插件来实现本地开发服务器,当文件发生改变时,自动刷新页面,无需手动刷新页面!
安装插件 1 npm install webpack-dev-server -D
配置插件 webpack.config.js
1 2 3 4 5 6 7 8 9 10 module .exports = { devServer : { open : true , port : 3000 , host : 'localhost' , } }
dev-server 服务启动后 不会生成资源目录(dist)! 它是在内存中编译过程中生成的!
启动服务 也可以在package.json配置scripts 来执行次命令!
package.json
1 2 3 4 5 "scripts" : { "test" : "echo \"Error: no test specified\" && exit 1" , "dev" : "npx webpack serve" , "build" : "npx webpack" }
生产模式 新建配置文件 config/webpack.dev.js 和 config/webpack.prod.js
webpack.dev.js
webpack.dev.js 1 2 3 4 5 6 7 8 9 10 11 12 13 14 15 16 17 18 19 20 21 22 23 24 25 26 27 28 29 30 31 32 33 34 35 36 37 38 39 40 41 42 43 44 45 46 47 48 49 50 51 52 53 54 55 56 57 58 59 60 61 62 63 64 65 66 67 68 69 70 71 72 73 74 75 76 77 78 79 80 81 82 83 84 85 86 87 88 89 90 91 92 93 94 95 96 97 98 99 100 101 102 103 104 105 106 107 108 109 110 111 112 113 114 115 116 117 118 119 120 121 122 123 124 125 126 127 128 129 130 131 132 133 134 const path = require ("path" );const ESLintPlugin = require ("eslint-webpack-plugin" );const HtmlWebpackPlugin = require ("html-webpack-plugin" );const resovlePath = (dir ) => path.resolve (__dirname, dir);module .exports = { entry : "./src/main.js" , output : { filename : "static/js/bundle.js" , clean : true , }, module : { rules : [ { test : /\.css$/ , use : [ "style-loader" , "css-loader" , ], }, { test : /\.less$/ , use : [ "style-loader" , "css-loader" , "less-loader" , ], }, { test : /\.scss$/ , use : [ "style-loader" , "css-loader" , "sass-loader" , ], }, { test : /\.styl$/ , use : [ "style-loader" , "css-loader" , "stylus-loader" , ], }, { test : /\.(png|jpg|jpeg|gif|svg|eot|png|ico)$/ , type : "asset" , parser : { dataUrlCondition : { maxSize : 100 * 1024 , }, }, generator : { filename : "static/image/[name].[hash:8][ext][query]" , }, }, { test : /\.ttf|woff|woff2?$/ , type : "asset/resource" , generator : { filename : "static/fonts/[name].[hash:8][ext][query]" , }, }, { test : /\.js$/ , exclude : /node_modules/ , use : { loader : "babel-loader" , }, }, ], }, plugins : [ new ESLintPlugin ({ context : resovlePath ('../src' ), extensions : ["js" , "vue" ], exclude : ["node_modules" ], }), new HtmlWebpackPlugin ({ template : resovlePath ("../public/index.html" ), }), ], mode : "development" , devServer : { open : true , host : "127.0.0.1" , port : 8080 , }, };
webpack.prod.js
webpack.prod.js 1 2 3 4 5 6 7 8 9 10 11 12 13 14 15 16 17 18 19 20 21 22 23 24 25 26 27 28 29 30 31 32 33 34 35 36 37 38 39 40 41 42 43 44 45 46 47 48 49 50 51 52 53 54 55 56 57 58 59 60 61 62 63 64 65 66 67 68 69 70 71 72 73 74 75 76 77 78 79 80 81 82 83 84 85 86 87 88 89 90 91 92 93 94 95 96 97 98 99 100 101 102 103 104 105 106 107 108 109 110 111 112 113 114 115 116 117 118 119 120 121 122 123 124 125 126 127 128 129 130 131 132 133 const path = require ("path" );const ESLintPlugin = require ("eslint-webpack-plugin" );const HtmlWebpackPlugin = require ("html-webpack-plugin" );const resovlePath = (dir ) => path.resolve (__dirname, dir);module .exports = { entry : "./src/main.js" , output : { path : resovlePath ("../dist" ), filename : "static/js/bundle.js" , clean : true , }, module : { rules : [ { test : /\.css$/ , use : [ "style-loader" , "css-loader" , ], }, { test : /\.less$/ , use : [ "style-loader" , "css-loader" , "less-loader" , ], }, { test : /\.scss$/ , use : [ "style-loader" , "css-loader" , "sass-loader" , ], }, { test : /\.styl$/ , use : [ "style-loader" , "css-loader" , "stylus-loader" , ], }, { test : /\.(png|jpg|jpeg|gif|svg|eot|png|ico)$/ , type : "asset" , parser : { dataUrlCondition : { maxSize : 100 * 1024 , }, }, generator : { filename : "static/image/[name].[hash:8][ext][query]" , }, }, { test : /\.ttf|woff|woff2?$/ , type : "asset/resource" , generator : { filename : "static/fonts/[name].[hash:8][ext][query]" , }, }, { test : /\.js$/ , exclude : /node_modules/ , use : { loader : "babel-loader" , }, }, ], }, plugins : [ new ESLintPlugin ({ context : resovlePath ("../src" ), extensions : ["js" , "vue" ], exclude : ["node_modules" ], }), new HtmlWebpackPlugin ({ template : resovlePath ("../public/index.html" ) }), ], mode : "development" , devServer : { open : true , host : "127.0.0.1" , port : 8080 , }, };
注意: 在webpack.dev.js和webpack.prod.js 中我们需要将path.resolve()中的路径改为.../xxx上一级目录!config/xxxx.xx.xx目录下, 而path.resolve是在当前目录下,也就是config/xxxx.xx.xx目录下,所以需要上一级目录../!
配置package.json脚本
通过 --config ./config/webpack.dev.js来指定配置文件所在路径!
1 2 3 4 5 "scripts" : { "test" : "echo \"Error: no test specified\" && exit 1" , "dev" : "npx webpack serve --config ./config/webpack.dev.js" , "build" : "npx webpack --config ./config/webpack.prod.js" } ,
提取css成单独文件 css文件 会打包到js中,当文件加载时,会创建style标签来生成样式!会出现闪屏问题,我们应该是单独的css文件,通过link方式引入!
css 会通过 loader进行处理!css -> js -> html[head标签中 ] 然后再输出-> style
以上截图是打包后`style`标签位于 `head`
1 npm install mini-css-extract-plugin -D
插件配置 style-loader 我们需要将这个替换成MiniCssExtractPlugin.loaderstyle-loader 就是将js中到css输出到html中<style>, 所以要提取css文件到话可以注释掉!通过注入<style> _ 标记将CSS添加到DOM中
1 2 3 4 5 6 7 8 9 module .exports = { plugins : [ new MiniCssExtractPlugin ({ filename : "static/css/main.css" }) ] }
code webpack.prod.js 1 2 3 4 5 6 7 8 9 10 11 12 13 14 15 16 17 18 19 20 21 22 23 24 25 26 27 28 29 30 31 32 33 34 35 36 37 38 39 40 41 42 43 44 45 46 47 48 49 50 51 52 53 54 55 56 57 58 59 60 61 62 63 64 65 66 67 68 69 70 71 72 73 74 75 76 77 78 79 80 81 82 83 84 85 86 87 88 89 90 91 92 93 94 95 96 97 98 99 100 101 102 103 104 105 106 107 108 109 110 111 112 113 114 115 116 117 118 119 120 121 122 123 124 125 126 127 128 const path = require ("path" );const ESLintPlugin = require ("eslint-webpack-plugin" );const HtmlWebpackPlugin = require ("html-webpack-plugin" );const MiniCssExtractPlugin = require ("mini-css-extract-plugin" );const resovlePath = (dir ) => path.resolve (__dirname, dir);module .exports = { entry : "./src/main.js" , output : { path : resovlePath ("../dist" ), filename : "static/js/bundle.js" , clean : true , }, module : { rules : [ { test : /\.css$/ , use : [ + MiniCssExtractPlugin .loader , "css-loader" , ], }, { test : /\.less$/ , use : [ + MiniCssExtractPlugin .loader , "css-loader" , "less-loader" , ], }, { test : /\.scss$/ , use : [ MiniCssExtractPlugin .loader , "css-loader" , "sass-loader" , ], }, { test : /\.styl$/ , use : [ + MiniCssExtractPlugin .loader , "css-loader" , "stylus-loader" , ], }, { test : /\.(png|jpg|jpeg|gif|svg|eot|png|ico)$/ , type : "asset" , parser : { dataUrlCondition : { maxSize : 100 * 1024 , }, }, generator : { filename : "static/image/[name].[hash:8][ext][query]" , }, }, { test : /\.ttf|woff|woff2?$/ , type : "asset/resource" , generator : { filename : "static/fonts/[name].[hash:8][ext][query]" , }, }, { test : /\.js$/ , exclude : /node_modules/ , use : { loader : "babel-loader" , }, }, ], }, plugins : [ new ESLintPlugin ({ context : resovlePath ("../src" ), extensions : ["js" , "vue" ], exclude : ["node_modules" ], }), new HtmlWebpackPlugin ({ template : resovlePath ("../public/index.html" ), }), + new MiniCssExtractPlugin ({ filename : "static/css/main.css" }) ], };
postcss样式兼容性处理需要安装的插件包
postcss-loader postcss postcss-preset-env
安装插件 1 npm install postcss-loader postcss postcss-preset-env -D
配置postcss-loader 在配置文件中配置postcss-loader
在 css scss styl less - loader中配置postcss-loader!module > rules > use > css-loader 同级下配置!
1 2 3 4 5 6 7 8 9 { loader: "postcss-loader" , options: { postcssOptions: { plugins: [ "postcss-preset-env" ] , } , } , }
code webpack.prod.js 1 2 3 4 5 6 7 8 9 10 11 12 13 14 15 16 17 18 19 20 21 22 23 24 25 26 27 28 29 30 31 32 33 34 35 36 37 38 39 40 41 42 43 44 45 46 47 48 49 50 51 52 53 54 55 56 57 58 59 60 61 62 63 64 65 66 67 68 69 70 71 72 73 74 75 76 77 78 79 80 81 82 83 84 85 86 87 88 89 90 91 92 93 94 95 96 97 98 99 100 101 102 103 104 105 106 107 108 109 110 111 112 113 114 115 116 117 118 119 120 121 122 123 124 125 126 127 128 129 130 131 132 133 134 135 136 137 138 139 140 141 142 143 144 145 146 147 148 149 150 151 152 153 154 155 156 157 158 159 160 161 162 163 164 165 166 167 168 169 170 171 172 const path = require ("path" );const ESLintPlugin = require ("eslint-webpack-plugin" );const HtmlWebpackPlugin = require ("html-webpack-plugin" );const MiniCssExtractPlugin = require ("mini-css-extract-plugin" );const resovlePath = (dir ) => path.resolve (__dirname, dir);module .exports = { entry : "./src/main.js" , output : { path : resovlePath ("../dist" ), filename : "static/js/bundle.js" , clean : true , }, module : { rules : [ { test : /\.css$/ , use : [ MiniCssExtractPlugin .loader , "css-loader" , { loader : "postcss-loader" , options : { postcssOptions : { plugins : ["postcss-preset-env" ], }, }, }, ], }, { test : /\.less$/ , use : [ MiniCssExtractPlugin .loader , "css-loader" , { loader : "postcss-loader" , options : { postcssOptions : { plugins : ["postcss-preset-env" ], }, }, }, "less-loader" , ], }, { test : /\.scss$/ , use : [ MiniCssExtractPlugin .loader , "css-loader" , { loader : "postcss-loader" , options : { postcssOptions : { plugins : ["postcss-preset-env" ], }, }, }, "sass-loader" , ], }, { test : /\.styl$/ , use : [ MiniCssExtractPlugin .loader , "css-loader" , { loader : "postcss-loader" , options : { postcssOptions : { plugins : ["postcss-preset-env" ], }, }, }, "stylus-loader" , ], }, { test : /\.(png|jpg|jpeg|gif|svg|eot|png|ico)$/ , type : "asset" , parser : { dataUrlCondition : { maxSize : 100 * 1024 , }, }, generator : { filename : "static/image/[name].[hash:8][ext][query]" , }, }, { test : /\.ttf|woff|woff2?$/ , type : "asset/resource" , generator : { filename : "static/fonts/[name].[hash:8][ext][query]" , }, }, { test : /\.js$/ , exclude : /node_modules/ , use : { loader : "babel-loader" , }, }, ], }, plugins : [ new ESLintPlugin ({ context : resovlePath ("../src" ), extensions : ["js" , "vue" ], exclude : ["node_modules" ], }), new HtmlWebpackPlugin ({ template : resovlePath ("../public/index.html" ), }), new MiniCssExtractPlugin ({ filename : "static/css/main.css" , }), ], mode : "development" , devServer : { open : true , host : "127.0.0.1" , port : 8080 , }, };
配置package.json 配置browserslist 浏览器版本!
1 2 3 "browserslist" : [ "ie >= 8" ]
1 2 3 4 5 "browserslist" : [ "last 2 version" , "> 1%" , "not dead" ]
"last 2 version" 所有浏览器最后两个版本!> 1% 覆盖99%的浏览器版本! 冷门的浏览器不要了!not dead 不更新版本的浏览器也不需要!
封装loader配置 在webpack.prod.js中定义getStyleLoader()
1 2 3 4 5 6 7 8 9 10 11 12 13 14 15 16 17 function getStyleLoader ( pre = '' ){ return [ MiniCssExtractPlugin .loader , "css-loader" , { loader : "postcss-loader" , options : { postcssOptions : { plugins : ["postcss-preset-env" ], }, }, }, pre, ].filter (Boolean ); }
使用
1 2 3 4 5 6 7 8 9 10 11 12 13 14 15 16 17 18 rules : [ { test : /\.css$/ , use : getStyleLoader (), }, { test : /\.less$/ , use : getStyleLoader ("less-loader" ), }, { test : /\.scss$/ , use : getStyleLoader ("sass-loader" ), }, { test : /\.styl$/ , use : getStyleLoader ("stylus-loader" ), }, ]
css压缩安装插件 1 npm install css-minimizer-webpack-plugin -D
webpack 高级配置
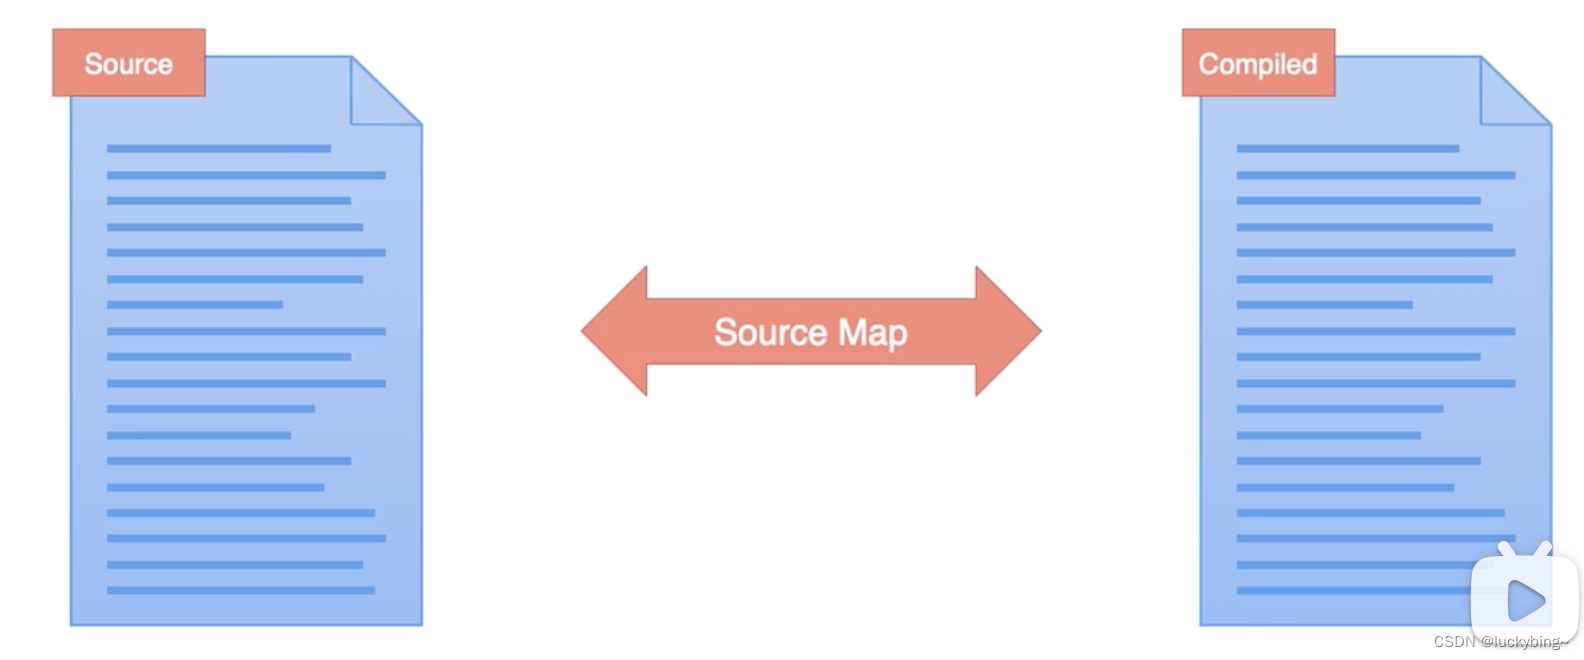
sourceMapSourceMap (源代码映射)是一个用来生成源代码与构建后代码一一映射的文件的方案。它会生成一个 xxx.map文件,里面包含源代码和构建后代码每一行、每一列的映射关系。当构建后代码出错了,会通过xxx.map 文件,从构建后代码出错位置找到映射后源代码出错位置,从而让浏览器提示源代码文件出错位置,帮助我们更快的找到错误根源。
development
1 2 3 mode : "development" ,devtool : "cheap-module-source-map" ,
production
1 2 3 mode : "development" ,devtool : "source-map" ,
在 webpack.config.js 中 module.exports 里面加一行
devtool有很多source-map形式,详情见webpack手册devtool部分
引用站外地址
sourceMap
https://blog.csdn.net/formylovetm/article/details/126095387
HMRHotModuleReplacement (HMR/热模块替换): 在程序运行中,替换、添加或删除模块,而无需重新加载整个页面。
1 2 3 4 5 6 7 8 9 10 11 devServer : { open : true , host : "127.0.0.1" , port : 8080 , hot : true },
注意: css 方面 style-loader对HRM做了相关处理, 但是js方面是不行的! 如果是开发vue中vue-loader是做了HRM处理的!
不过js也可以这么处理main.js中
1 2 3 4 5 6 if ( module .hot ){ module .hot .accept ('./js/count.js' ); module .hot .accept ('./App.vue' ,()=> { console .log ("文件发生了变化!" ) } }
OneOf放在oneOf代码块中的 loader 只会匹配一个,避免每一个文件在打包时每个loader都要过一遍。注意:不能有两项配置处理同一种类型的文件例如:js文件的语法检查和兼容性处理,不能放在同一个oneOf中。
1 2 3 4 5 6 7 8 9 10 11 12 13 14 15 16 17 18 19 20 21 22 23 24 25 26 27 28 29 30 31 32 33 34 35 36 rules : [ { oneOf : [ { test : /\.css$/ , use : getStyleLoader (), }, { test : /\.less$/ , use : getStyleLoader ("less-loader" ), }, { test : /\.scss$/ , use : getStyleLoader ("sass-loader" ), }, { test : /\.styl$/ , use : getStyleLoader ("stylus-loader" ), }, { test : /\.js$/ , exclude : /node_modules/ , use : { loader : "babel-loader" , }, }, ], }, ]
include(包函) 和 exclude(排除)开发时我们需要使用第三方的库或插件,所有文件都下载到 node_modules 中了。而这些文件是不需要编译可以直接使用的。js文件处理时,要排除 node _modules 下面的文件.
include 只处理包含中的文件!exclude 排除不需要中的文件!`注意: 这两种方式只能写一个 要么 include 要么exclude!
babel-loader
1 2 3 4 5 6 7 8 9 10 11 12 13 14 15 16 { test : /\.js$/ , include : path.resolve (__dirname, "../src" ), use : { loader : "babel-loader" , }, },
eslint
1 2 3 4 5 6 7 8 9 10 plugins : [ new ESLintPlugin ({ context : resovlePath ("../src" ), extensions : ["js" , "vue" ], exclude : ["node_modules" ], }), ]
cache 缓存每次打包时 js 文件都要经过 Eslint 检查 和 Babel 编译,速度比较慢我们可以缓存之前的 Eslint 检查和 Babel编译结果,这样第二次打包时速度就会更快了!
babel-loader
1 2 3 4 5 6 7 8 9 10 11 12 13 14 15 16 17 18 { test : /\.js$/ , exclude : /node_modules/ , use : { loader : "babel-loader" , options : { cacheDirectory : true , cacheCompression : false , } }, }
eslint1 2 3 4 5 6 7 8 9 10 11 12 new ESLintPlugin ({ context : resovlePath ("../src" ), extensions : ["js" , "vue" ], exclude : ["node_modules" ], cache : true , cacheLocation : resovlePath ("../node_modules/.cache/eslint" ) })
多进程打包 当项目越来越庞大时,打包速度越来越慢,甚至于需要一个下午才能打包出来代码。这个速度是比较慢的。eslint、babel、Terser 三个工具,所以我们要提升它们的运行速度.多进程同时处理js 文件,这样速度就比之前的单进程打包更快了.
多进程打包: 开启电脑的多个进程同时干一件事,速度更快。需要注意: 请仅在特别耗时的操作中使用,因为每个进程启动就有大约为 600ms 左右开销,
安装插件
1 npm install thread-loader -D
使用插件
折叠: 配置多进程打包 1 2 3 4 5 6 7 8 9 10 11 12 13 14 15 16 17 18 19 20 21 22 23 24 25 26 27 28 29 30 31 32 33 34 35 36 37 38 39 40 41 42 43 44 45 46 47 48 49 50 51 52 53 54 55 56 57 58 59 60 61 62 63 64 65 66 67 68 69 70 71 72 73 const os = require ("os" );const threads = os.cpus ().length ;const TerserWebpackPlugin = require ("terser-webpack-plugin" );const CssMinimizerWepackPlugin = require ("css-minimizer-webpack-plugin" );module .exports = { module : { rules : [ { test : /\.js$/ , exclude : /node_modules/ , use : [ { loader : "thread-loader" , options : { works : threads, }, }, { loader : "babel-loader" , options : { cacheDirectory : true , cacheCompression : false , }, }, ], }, ] }, plugins : [ new ESLintPlugin ({ context : resovlePath ("../src" ), extensions : ["js" , "vue" ], exclude : ["node_modules" ], cache : true , cacheLocation : resovlePath ("../node_modules/.cache/eslint" ), threads }), ], optimization : { minimizer : [ new CssMinimizerWepackPlugin (), new TerserWebpackPlugin ({ parallel : threads, }), ], }, }
减少代码体积 tree-shakingTree Shaking 是一个术语,通常用于描述移除 JavaScript 中的没有使用上的代码!
它依赖于 ES Module 的静态分析能力,所以需要使用 ES Module 的代码才能使用 Tree Shaking!
webpack 已经默认这个功能,无需配置!
babel生成文件的体积Babel 为编译的每个文件都插入了辅助代码,使代码体积过大!Babel 对一些公共方法使用了非常小的辅助代码,比如_extend默认情况下会被添加到每一个需要它的文件中 。
@babel/plugin-transform-runtime :禁用了 Babel 自动对每个文件的 runtime 注入,而是引入@babel/plugin-transform-runtime并且使所有辅助代码从这里引用。
安装插件
1 npm install @babel/plugin-transform-runtime -D
使用插件
1 2 3 4 5 6 7 8 9 10 11 12 13 14 { loader : "babel-loader" , options : { cacheDirectory : true , cacheCompression : false , plugins : ["@babel/plugin-transform-runtime" ], } },
图片压缩 安装插件 1 npm i image-minimizer-webpack-plugin imagemin -D
无损压缩
1 npm install imagemin-gifsicle imagemin-jpegtran imagemin-optipng imagemin-svgo -D
配置项 1 2 3 4 5 6 7 8 9 10 11 12 13 14 15 16 17 18 19 20 21 22 const ImageMinimizerPlugin = require ('image-minimizer-webpack-plugin' ); module .exports = { optimization : { minimize : true , }, plugins : [ new ImageMinimizerPlugin ({ minimizer : { implementation : ImageMinimizerPlugin .imageminMinify , options : { }, }, include : /\.(jpe?g|png|gif|svg|webp)$/i , }), ], };
CodeSplit代码分割打包代码时会将所有 js 文件打包到一个文件中,体积太大了。我们如果只要渲染首页,就应该只加载首页的 js 文件,其他文件不应该加载。将打包生成的文件进行代码分割,生成多个 js 文件,渲染哪个页面就只加载某个 js 文件,这样加载的资源就少,速度就更快。
分割文件:将打包生成的文件进行分割,生成多个 js 文件。按需加载:需要哪个文件就加载哪个文件。安装插件
1 npm i webpack webpack-cli html-webpack-plugin -D
多入口文件配置 app 与 src/app.js相对应!main 与 src/main.js相对应!
1 2 3 4 entry : { app : "./src/app.js" , main : "./src/main.js" , }
1 2 3 4 5 6 7 8 ├── package-lock.json ├── package.json ├── public │ └── index.html ├── src │ ├── app.js │ └── main.js └── webpack.config.js
1 2 3 import { sum } from "./main" ;const result = sum (1 , 2 , 3 );console .log ("file app.js" + result);
1 2 3 4 console .log ("file main.js" );export function sum (...args ){ return args.reduce ((c,p ) => c+=p, 0 ); }
webpack.config.js
webpack.config.js 1 2 3 4 5 6 7 8 9 10 11 12 13 14 15 16 17 18 19 20 21 22 23 24 25 const path = require ('path' );const HtmlWebpackPlugin = require ("html-webpack-plugin" );module .exports = { mode : "production" , entry : { app : "./src/app.js" , main : "./src/main.js" , }, output : { path : path.resolve (__dirname, "dist" ), filename : "static/js/[name].js" , clean : true , }, plugins : [ new HtmlWebpackPlugin ({ template : path.resolve (__dirname, "public/index.html" ), }), ], };
[name]是webpack命名规则,使用chunk的name作为输出的文件名。chunk?打包的资源就是chunk,输出出去叫bundle。chunk的name是啥呢? 比如: entry中xxx: "./src/xxx.js", name就是xxx。注意是前面的xxx,和文件名无关。main.js,那么打包生成两个js文件都会叫做main.js会发生覆盖。(实际上会直接报错的)
提取重复代码 如果多入口文件中都引用了同一份代码,我们不希望这份代码被打包到两个文件中,导致代码重复,体积更大。需要提取多入口的重复代码,只打包生成一个 js 文件,其他文件引用它就好。
新建src/utils/math.js文件
src/math.js src/app.js src/main.js 1 2 3 export function sum (...args ) { return args.reduce ((c, p ) => (c += p), 0 ); }
1 2 3 4 import { sum } from "./utils/math" ;const result = sum (1 , 2 , 3 );console .log ("file app.js" + result);
1 2 3 4 import { sum } from "./utils/math" ;const result = sum (1 , 2 , 3 );console .log ("file main.js" + result);
配置optimization优化项 添加 optimization > splitChunks 代码分割配置
webpack.config.js 1 2 3 4 5 6 7 8 9 10 11 12 13 14 15 16 17 18 19 20 21 22 23 24 25 26 27 28 29 30 31 32 33 34 35 36 37 38 39 40 41 42 43 optimization : { splitChunks : { chunks : "all" , cacheGroups : { default : { minSize : 0 , minChunks : 2 , priority : -20 , reuseExistingChunk : true , }, }, }, }
cacheGroups > default 配置会覆盖 splitChunks配置3 个 js 文件,其中有一个就是提取的公共模块。
按需加载 import("./utils/count"); 通过import() 函数实现按需加载。当我需要这个模块时去import动态加载这个模块一开始我就要加载这个模块!
如果动态导入 import eslint 报错时可以加以下配置!
.eslintrc.js
1 2 3 module .exports = { plugins : ["import" ] }
新建src/utils/count.js文件
src/count.js src/app.js src/main.js 1 2 3 export function count (x, y ){ return x + y; }
1 2 3 4 import { sum } from "./utils/math" ;const result = sum (1 , 2 , 3 );console .log ("file app.js" + result);
1 2 3 4 5 6 7 8 9 10 11 12 import { sum } from "./utils/math" ;const result = sum (1 , 2 , 3 );console .log ("file main.js" + result);document .getElementById ("btn" ).onclick = async function ( const result = await import ("./utils/count" ); console .log (result.count (1 ,2 )); };
单文件相关配置 splitChunk1 2 3 4 5 6 7 optimization : { splitChunks : { chunks : "all" , } }
给模块命名通过此 webpackChunkName: "name" 来设置打包后的文件名!
import(/*webpackChunkName: "name" */ "./js/math")
main.js
1 2 3 4 document .getElementById ("btn" ).onclick = async function ( const result = await import ( "./utils/count" ); console .log (result.count (1 ,2 )); };
在webpack.config.js中配置1 2 3 4 5 6 7 8 9 output : { path : path.resolve (__dirname, "dist" ), filename : "static/js/[name].js" , chunkFilename : "static/js/[name].js" , clean : true , }
统一命名1 2 3 4 5 6 7 8 9 10 11 12 13 14 15 16 17 18 19 20 21 22 23 24 module .exports = { output : { path : path.resolve (__dirname, "../dist" ), filename : "static/js/[name].js" , chunkFilename : "static/js/[name].chunk.js" , assetModuleFilename : "static/media/[name].[hash][ext]" , clean : true , }, plugins : [ new MiniCssExtractPlugin ({ filename : "static/css/[name].css" , }), ] }
preload 和 prefetchpreload 和 prefetch 都是预加载,但是preload 是提前加载,prefetch 是延后加载。
我们前面已经做了代码分割,同时会使用 import 动态导入语法来进行代码按需加载(我们也叫懒加载,比如路由懒加载就是这样实现的)。是加载速度还不够好,比如:是用户点击按钮时才加载这个资源的,如果资源体积很大,那么用户会感觉到明显卡顿效果。Preload 或 Prefetch 技术。
Preload:告诉浏览器立即加载资源。Prefetch:告诉浏览器在空闲时才开始加载资源。都只会加载资源,并不执行。都有缓存。Preload: 加载优先级高,Prefetch: 加载优先级低。Preload: 只能加载当前页面需要使用的资源,Prefetch: 可以加载当前页面资源,也可以加载下一个页面需要使用的资源。当前页面优先级高的资源用 Preload 加载。下一个页面需要使用的资源用 Prefetch 加载。
注意: Preload 相对于 Prefetch 兼容性好一点。
安装包
1 npm i @vue/preload-webpack-plugin -D
webpack.config.js1 2 3 4 5 6 7 8 9 10 const PreloadWebpackPlugin = require ("@vue/preload-webpack-plugin" );module .exports = { plugins : [ new PreloadWebpackPlugin ({ rel : "preload" , as : "script" , }) ] }
引用站外地址
Preload / Prefetch
https://yk2012.github.io/sgg_webpack5/senior/optimizePerformance.html#preload-prefetch
network cache将来开发时我们对静态资源会使用缓存来优化,这样浏览器第二次请求资源就能读取缓存了,速度很快。前后输出的文件名是一样的,都叫 main.js,一旦将来发布新版本,因为文件名没有变化导致浏览器会直接读取缓存,不会加载新资源,项目也就没法更新了。所以我们从文件名入手,确保更新前后文件名不一样,这样就可以做缓存了。
hash、contenthash 和 chunkhash 是通过散列函数处理之后,生成的一串字符,可用于区分文件。善用文件的哈希值,解决浏览器缓存导致的资源未及时更新的问题
引用站外地址
webpack_hash相关介绍
https://blog.csdn.net/sky___Show/article/details/134463495
为了解决这个问题,我们通常会在文件名上加一些哈希值,保证当更新文件时,浏览器会重新下载资源。这里使用 hash这个占位符
缓存配置
这里通过optimization.runtimeChunk.name来配置, 避免: 一个文件被改动时,在其他模块下被引用的文件也会被改动。我们只关心被更改过的文件需要改动!
1 2 3 4 5 6 7 8 module .exports = { optimization : { runtimeChunk : { name : ( entry ) => `runtimeChunl-${entry.name} ` } } }
配置文件 contenthash
同一个 chunk 中,部分文件修改导致所有文件的哈希值发生变化的问题,可以使用 contenthash 来解决,contenthash 只和每一个文件的内容有关,内容发生变化,则重新生成哈希值!
contenthash 1 2 3 4 5 6 7 8 9 10 11 12 13 14 15 16 17 18 19 20 21 22 23 24 25 26 27 28 29 30 31 32 33 34 35 36 37 38 39 40 41 42 43 44 45 46 47 48 49 50 51 52 module .exports = { output : { path : resovlePath ("../dist" ), filename : "static/js/[name].js" , chunkFilename : "static/js/[name].[contenthash:8].chunk.js" , assetModuleFilename : "static/images/[contenthash:10][ext][query]" , clean : true , }, module : { rules : [ { test : /\.(png|jpg|jpeg|gif|svg|eot|png|ico)$/ , type : "asset" , parser : { dataUrlCondition : { maxSize : 100 * 1024 , }, }, generator : { filename : "static/image/[name].[contenthash:8][ext][query]" , }, }, { test : /\.ttf|woff|woff2?$/ , type : "asset/resource" , generator : { filename : "static/fonts/[name].[contenthash:8][ext][query]" , }, } ] }, plugins : [ new MiniCssExtractPlugin ({ filename : "static/css/[name].[contenthash:8].css" , }), ] }
core-js兼容 ES6或最新语法!过去我们使用 babel 对 js 代码进行了兼容性处理,其中使用@babel/preset-env智能预设来处理兼容性问题。ES6 的一些语法进行编译转换,比如箭头函数、... 运算符等。但是如果是 async 函数、promise对象、数组的一些方法(includes)等,它没办法处理。
core-js是专门用来做ES6 以及以上 API 的 polyfill。polyfill翻译过来叫做垫片/补丁。就是用社区上提供的一段代码,让我们在不兼容某些新特性的浏览器上,使用该新特性。
安装 core-js
全局引入 core-js
main.js
按需引入 core-js
main.js
1 import "core-js/e/promise" ;
按需引入 打包后,虽然体积小了,但是有许多新的语法内容 不可能一个个导入吧!
通过@babel/preset-env预设,来帮我门自动按需导入!预设会自动分析代码中有哪些需要转换的 并 进行按需导入处理!
babel.config.js
1 2 3 4 5 6 7 8 9 10 11 12 13 module .exports = { presets : [ [ "@babel/preset-env" , { useBuiltIns : "usage" , corejs : 3 }, ], ], };
PWA处理离线问题PWA是渐进式网络应用程序(progressive web application - PWA):是一种可以提供类似于 native app(原生应用程序) 体验的 Web App 的技术。在 离线(offline) 时应用程序能够继续运行功能。Service Workers 技术实现的。
安装包
1 npm i workbox-webpack-plugin -D
修改配置文件webpack.config.js
1 2 3 4 5 6 7 8 9 10 11 12 const WorkboxPlugin = require ("workbox-webpack-plugin" );module .exports = { plugins : [ new WorkboxPlugin .GenerateSW ({ clientsClaim : true , skipWaiting : true , }) ] }
修改main.js
加入以下代码! 判断浏览器是否支持 ServiceWorkers
1 2 3 4 5 6 7 8 9 10 11 12 if ("serviceWorker" in navigator) { window .addEventListener ("load" , () => { navigator.serviceWorker .register ("/service-worker.js" ) .then ((registration ) => { console .log ("SW registered: " , registration); }) .catch ((registrationError ) => { console .log ("SW registration failed: " , registrationError); }); }); }
在 chrome 中好像访问不到`serviceWorker`...
总结 总结 我们从 4 个角度对 webpack 和代码进行了优化:
提升开发体验Source Map 让开发或上线时代码报错能有更加准确的错误提示。提升 webpack 提升打包构建速度HotModuleReplacement 让开发时只重新编译打包更新变化了的代码,不变的代码使用缓存,从而使更新速度更快。OneOf 让资源文件一旦被某个 loader 处理了,就不会继续遍历了,打包速度更快。Include/Exclude 排除或只检测某些文件,处理的文件更少,速度更快。Cache 对 eslint 和 babel 处理的结果进行缓存,让第二次打包速度更快。Thead 多进程处理 eslint 和 babel 任务,速度更快。(需要注意的是,进程启动通信都有开销的,要在比较多代码处理时使用才有效果) 减少代码体积Tree Shaking 剔除了没有使用的多余代码,让代码体积更小。@babel/plugin-transform-runtime 插件对 babel 进行处理,让辅助代码从中引入,而不是每个文件都生成辅助代码,从而体积更小。Image Minimizer 对项目中图片进行压缩,体积更小,请求速度更快。(需要注意的是,如果项目中图片都是在线链接,那么就不需要了。本地项目静态图片才需要进行压缩。)优化代码运行性能Code Split 对代码进行分割成多个 js 文件,从而使单个文件体积更小,并行加载 js 速度更快。并通过 import 动态导入语法进行按需加载,从而达到需要使用时才加载该资源,不用时不加载资源。Preload / Prefetch 对代码进行提前加载,等未来需要使用时就能直接使用,从而用户体验更好。Network Cache 能对输出资源文件进行更好的命名,将来好做缓存,从而用户体验更好。Core-js 对 js 进行兼容性处理,让我们代码能运行在低版本浏览器。PWA 能让代码离线也能访问,从而提升用户体验。webpack 和 vue3配置开发模式配置准备 vue 相关包依赖包 描述 vuevue 框架 vue-loadervue 模块加载器,在项目中用来解析.vue文件! vue-template-compilervue 模板编译器 是编译vue模板(template)的包,传入模板返回AST抽象语法树,ast是为了生成render函数用的。 vue-style-loadervue 样式加载器
安装 vue
安装 vue plugin
1 npm install vue-loader vue-style-loader vue-template-compiler -D
配置webpacl.config.js 在webpack.config.js 顶部位置加入vue-loader
1 2 3 4 5 6 7 8 9 10 11 12 13 14 15 16 17 18 import { VueLoaderPlugin } from "vue-loader" ;module .exports = { module : { rules : [ { test : /\.vue$/ , use : "vue-loader" } ] }, plugins : [ new VueLoaderPlugin (), ] }
目录结构 1 2 3 4 5 6 7 8 9 10 11 12 13 14 15 16 17 18 19 20 21 22 23 24 25 26 27 ├── babel.config.js ├── dist │ ├── index.html │ └── static │ ├── images │ │ └── flutter_launcher_icons_run.103b4c4cc8.jpg │ └── js │ └── main.js ├── package-lock.json ├── package.json ├── pnpm-lock.yaml ├── public │ └── index.html ├── src │ ├── App.vue │ ├── assets │ │ └── image │ │ └── flutter_launcher_icons_run.jpg │ ├── components │ ├── main.js │ ├── style │ │ └── index.css │ ├── utils │ │ └── index.js │ └── views │ └── index.vue └── webpack.config.js
新建App.vue app.vue 1 2 3 4 5 6 7 8 9 10 11 12 13 14 15 16 17 18 <template > <div class ="title" > hello-webpack-vue <index /> </div > </template > <script setup > import index from './views/index.vue' ;</script > <style scoped > .title { color : blueviolet; font-size : 18px ; text-align : center; } </style >
挂载app.vue到#app 1 2 3 4 import { createApp } from 'vue' ;import App from './App.vue' ;createApp (App ).mount ('#app' );
确保public/index.html 中已有<div id="#app"></div>
配置package.json 在package.json中配置scripts.dev脚本!
1 2 3 4 5 "scripts" : { "test" : "echo \"Error: no test specified\" && exit 1" , "dev" : "npx webpack serve" , "build" : "npx webpack" }
确保webpack.config.js中配置了devServer,如果没有配置需要安装以下插件,进行配置!
1 npm install webpack-dev-server -D
然后在`webpack.config.js`中配置`devServer`!
1 2 3 4 5 6 7 8 module .exports = { devServer : { host : "localhost" , port : 3000 , open : true , hot : true , } }
vue 警告问题runtime-core.esm-bundler.js:5371 Feature flags __VUE_OPTIONS_API__, __VUE_PROD_DEVTOOLS__, __VUE_PROD_HYDRATION_MISMATCH_DETAILS__ are not explicitly defined. You are running the esm-bundler build of Vue, which expects these compile-time feature flags to be globally injected via the bundler config in order to get better tree-shaking in the production bundle.
For more details, see https://link.vuejs.org/feature-flags .
需要在 webpack.config.js 中加以配置!
1 2 3 4 5 6 7 8 9 10 11 import { DefinePlugin } from 'webpack' ;module .exports = { plugins : [ new DefinePlugin ({ __VUE_OPTIONS_API__ : "true" , __VUE_PROD_DEVTOOLS__ : "false" , __VUE_PROD_HYDRATION_MISMATCH_DETAILS__ : "false" , }) ] }
vue3 eslint配置plugin:vue/vue3-essential 需要安装以下插件!
1 npm install eslint-plugin-vue -D
新建 .eslintrc.js
eslintrc 1 2 3 4 5 6 7 8 9 10 11 12 13 14 15 16 17 18 19 module .exports = { root : true , env : { node : true , browser : true , }, extends : ["plugin:vue/vue3-essential" , "eslint:recommended" ], parserOptions : { ecmaVersion : 6 , sourceType : "module" , }, rules : { "no-console" : process.env .NODE_ENV === "production" ? "warn" : "off" , "no-debugger" : process.env .NODE_ENV === "production" ? "warn" : "off" , "no-var" : "error" , }, };
webpack.config.js 1 2 3 4 5 6 7 8 9 10 11 12 13 14 15 16 17 18 19 20 21 22 23 24 25 26 27 28 29 30 31 32 33 34 35 36 37 38 39 40 41 42 43 44 45 46 47 48 49 50 51 52 53 54 55 56 57 58 59 60 61 62 63 64 65 66 67 68 69 70 71 72 73 74 75 76 77 78 79 80 81 82 83 84 85 86 87 88 89 90 91 92 93 94 95 96 97 98 99 100 101 102 103 104 105 106 107 108 109 110 111 112 113 114 115 116 117 118 119 120 121 122 123 124 125 126 127 128 129 130 const path = require ("path" );const HtmlWebpackPlugin = require ("html-webpack-plugin" );const ESLintPlugin = require ("eslint-webpack-plugin" );const { VueLoaderPlugin } = require ("vue-loader" );const { DefinePlugin } = require ("webpack" );const resolve = (src ) => path.resolve (__dirname, src);function getStyleLoader (pre = "" ) { return [ "vue-style-loader" , "css-loader" , { loader : "postcss-loader" , options : { postcssOptions : { plugins : ["postcss-preset-env" ], }, }, }, pre, ].filter (Boolean ); } module .exports = { entry : "./src/main.js" , output : { path : resolve ("dist" ), filename : "static/js/[name].js" , chunkFilename : "static/js/[name].[contenthash:8].chunk.js" , assetModuleFilename : "static/images/[name].[contenthash:10][ext][query]" , clean : true , }, devServer : { host : "localhost" , port : 3000 , open : true , hot : true , }, module : { rules : [ { test : /\.css$/ , use : getStyleLoader (), }, { test : /\.js$/ , exclude : /node_modules/ , use : { loader : "babel-loader" , options : { cacheDirectory : true , cacheCompression : false , }, }, }, { test : /\.vue$/ , use : "vue-loader" , }, { test : /\.(png|jpe?g|gif|webp|svg)$/ , type : "asset" , parser : { dataUrlCondition : { maxSize : 10 * 1024 , }, }, }, ], }, plugins : [ new HtmlWebpackPlugin ({ template : resolve ("public/index.html" ), }), new ESLintPlugin ({ context : path.resolve (__dirname, "src" ), extensions : ["js" , "vue" ], exclude : ["node_modules" ], }), new VueLoaderPlugin (), new DefinePlugin ({ __VUE_OPTIONS_API__ : "true" , __VUE_PROD_DEVTOOLS__ : "false" , __VUE_PROD_HYDRATION_MISMATCH_DETAILS__ : "false" , }), ], mode : "development" , devtool : "cheap-module-source-map" , optimization : { splitChunks : { chunks : "all" , }, }, };
生产模式配置webpack.config.js 1 2 3 4 5 6 7 8 9 10 11 12 13 14 15 16 17 18 19 20 21 22 23 24 25 26 27 28 29 30 31 32 33 34 35 36 37 38 39 40 41 42 43 44 45 46 47 48 49 50 51 52 53 54 55 56 57 58 59 60 61 62 63 64 65 66 67 68 69 70 71 72 73 74 75 76 77 78 79 80 81 82 83 84 85 86 87 88 89 90 91 92 93 94 95 96 97 98 99 100 101 102 103 104 105 106 107 108 109 110 111 112 113 114 115 116 117 118 119 120 121 122 123 124 125 126 127 128 129 130 131 132 133 134 135 136 137 138 139 140 141 142 143 144 145 146 147 148 149 150 151 152 153 154 155 156 157 158 159 160 161 162 163 164 165 166 167 168 169 170 171 172 173 174 175 176 177 178 179 180 181 182 183 184 185 186 187 188 189 190 191 192 193 const path = require ("path" );const os = require ("os" );const HtmlWebpackPlugin = require ("html-webpack-plugin" );const MiniCssExtractPlugin = require ("mini-css-extract-plugin" );const CssMinimizerWepackPlugin = require ("css-minimizer-webpack-plugin" );const TerserWebpackPlugin = require ("terser-webpack-plugin" );const CopyPlugin = require ("copy-webpack-plugin" );const ESLintPlugin = require ("eslint-webpack-plugin" );const { VueLoaderPlugin } = require ("vue-loader" );const { DefinePlugin } = require ("webpack" );const threads = os.cpus ().length ;const resolve = (src ) => path.resolve (__dirname, src);const isProd = process.env .NODE_ENV === "production" ;console .log ("isProd" , isProd, process.env .NODE_ENV )function getStyleLoader (pre = "" ) { return [ isProd && MiniCssExtractPlugin .loader || "vue-style-loader" , "css-loader" , { loader : "postcss-loader" , options : { postcssOptions : { plugins : ["postcss-preset-env" ], }, }, }, pre, ].filter (Boolean ); } module .exports = { mode : (isProd && "production" ) || "development" , entry : "./src/main.js" , output : { path : (isProd && resolve ("dist" )) || undefined , filename : (isProd && "static/js/[name].[contenthash:8].js" ) || "static/js/[name].js" , chunkFilename : (isProd && "static/js/[name].[contenthash:8].chunk.js" ) || "static/js/[name].chunk.js" , assetModuleFilename : (isProd && "static/images/[name].[contenthash:10][ext][query]" ) || "static/images/[name].[ext][query]" , clean : true , }, devServer : { host : "localhost" , port : 3000 , open : true , hot : true , }, module : { rules : [ { test : /\.css$/ , use : getStyleLoader (), }, { test : /\.js$/ , exclude : /node_modules/ , use : { loader : "babel-loader" , options : { cacheDirectory : true , cacheCompression : false , }, }, }, { test : /\.vue$/ , use : "vue-loader" , }, { test : /\.(png|jpe?g|gif|webp|svg)$/ , type : "asset" , parser : { dataUrlCondition : { maxSize : 10 * 1024 , }, }, }, ], }, plugins : [ new HtmlWebpackPlugin ({ template : resolve ("public/index.html" ), }), new ESLintPlugin ({ context : path.resolve (__dirname, "src" ), extensions : ["js" , "vue" ], exclude : ["node_modules" ], }), isProd && new CopyPlugin ({ patterns : [ { from : path.resolve (__dirname, "./public" ), to : path.resolve (__dirname, "./dist" ), toType : "dir" , noErrorOnMissing : true , globOptions : { ignore : ["**/index.html" ], }, info : { minimized : true , }, }, ], }), isProd && new MiniCssExtractPlugin ({ filename : "static/css/[name].css" , chunkFilename : "static/css/[name].chunk.css" , }), new VueLoaderPlugin (), new DefinePlugin ({ __VUE_OPTIONS_API__ : "true" , __VUE_PROD_DEVTOOLS__ : "false" , __VUE_PROD_HYDRATION_MISMATCH_DETAILS__ : "false" , }), ].filter (Boolean ), devtool : (isProd && "source-map" ) || "cheap-module-source-map" , optimization : { minimize : isProd, minimizer : [ new CssMinimizerWepackPlugin (), new TerserWebpackPlugin ({ parallel : threads, }), ], splitChunks : { chunks : "all" , }, }, resolve : { alias : { "@" : resolve ("src" ), }, extensions : [".js" , ".json" , ".vue" ], }, };
注意: process.env.NODE_ENV 用到了cross-env插件,若未安装请先安装后在进行配置!
1 npm install cross-env -D
1 2 3 4 5 "scripts" : { "test" : "echo \"Error: no test specified\" && exit 1" , "dev" : "cross-env NODE_ENV=development npx webpack serve" , "build" : "cross-env NODE_ENV=production npx webpack" }
其它文件配置babel.config.js eslintrc.js 1 2 3 4 5 6 7 8 9 10 11 12 13 14 15 16 module .exports = { presets : [ [ "@vue/cli-plugin-babel/preset" ], ], };
1 2 3 4 5 6 7 8 9 10 11 12 13 14 15 16 17 18 19 20 module .exports = { root : true , env : { node : true , browser : true , }, extends : ["plugin:vue/vue3-essential" , "eslint:recommended" ], parserOptions : { parser : "@babel/eslint-parser" }, rules : { "no-console" : process.env .NODE_ENV === "production" ? "warn" : "off" , "no-debugger" : process.env .NODE_ENV === "production" ? "warn" : "off" , "no-var" : "error" , }, };
babel-plugin
1 npm install @vue/cli-plugin-babel -D
eslint-plugin
1 2 npm install eslint-plugin-vue -D npm install @babel/eslint-parser -D
优化配置 Element Plus安装 element plus1 npm install element-plus --save
全局引入全局引入 打包体积会变大!
main.js
1 2 3 4 5 6 7 8 9 10 import "./style/index.css" import ElementPlus from "element-plus" ;import "element-plus/dist/index.css" ;import { createApp } from 'vue' ;import App from './App.vue' ;const app = createApp (App );app.use (ElementPlus ); app.mount ('#app' );
按需引入首先你需要安装unplugin-vue-components 和 unplugin-auto-import这两款插件
这两个插件版本过高会报错!TypeError:Components is not a functionTypeError:AutoImport is not a function安装时 限定版本!
1 npm install -D unplugin-vue-components@0.25.2 unplugin-auto-import@0.16.1
引入插件
webpack.config.js
1 2 3 4 5 6 7 8 9 10 11 12 13 14 15 16 const AutoImport = require ('unplugin-auto-import/webpack' )const Components = require ('unplugin-vue-components/webpack' )const { ElementPlusResolver } = require ('unplugin-vue-components/resolvers' )module .exports = { plugins : [ AutoImport ({ resolvers : [ElementPlusResolver ()], }), Components ({ resolvers : [ElementPlusResolver ()], }), ], }
webpack配置缓存组webpack.config.js
1 2 3 4 5 6 7 8 9 10 11 12 13 14 15 16 17 18 19 20 21 22 23 24 25 26 27 28 29 30 31 32 33 34 35 36 37 38 39 module .exports = { optimization : { splitChunks : { chunks : "all" , cacheGroups : { layouts : { name : "layouts" , test : path.resolve (__dirname, "../src/layouts" ), priority : 40 , }, elementUI : { name : "chunk-elementPlus" , test : /[\\/]node_modules[\\/]_?element-plus(.*)/ , priority : 30 , }, vue : { name : "vue" , test : /[\\/]node_modules[\\/]vue(.*)[\\/]/ , chunks : "initial" , priority : 20 , }, libs : { name : "chunk-libs" , test : /[\\/]node_modules[\\/]/ , priority : 10 , chunks : "initial" , }, }, } } }
关闭性能分析提高打包速度1 2 3 4 5 6 7 8 9 10 11 module .exports = { performance : { hints : "warning" , maxEntrypointSize : 512000 , maxAssetSize : 512000 , } }
loader帮助 webpack 将不同类型的文件转换为 webpack 可识别的模块。
引用站外地址
loader介绍
https://yk2012.github.io/sgg_webpack5/origin/loader.html#loader-%E6%A6%82%E5%BF%B5
plugin引用站外地址
plugin介绍
https://yk2012.github.io/sgg_webpack5/origin/plugin.html#plugin-%E7%9A%84%E4%BD%9C%E7%94%A8


 微信
微信